Title (Fascinating, eh?)
You had me at title...
Hopefully this is obvious, but we'd like to encourage you to think about being creative with your choice of title for your response. It will be what catches someone's eye who might be looking at a long list of responses. It should be specific to the response you are writing and not just echo the name of the particular Challenge you are responding too.
Using The Rich text Editor
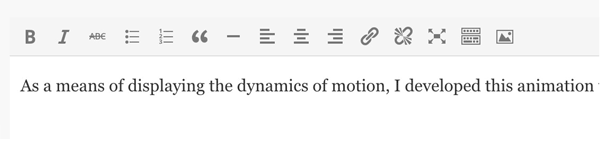
Hopefully most of the buttons are self-explanatory; this is a document editor not unlike Google Docs and exactly like a typical wordpress blog editor. If you need a reference for the button functions, see the visual editor documentation (this link opens in a new window).
You should be able to past in rich formatted content form any web page or a Word document. Most basic structural elements will be preserved such as headings, lists, bold, italic, hypertext links. Most other specific text formatting will be stripped clean. You may have to clean up some extraneous white space.
The editor has an additional set of editing tools that you may have to toggle open using the button second from the end on the right:
Using Media
The image button does not allow you to upload images to the site, it lets you use the URL for an image that exists elsewhere on the internet. It should be a link to a JPG, PNG, or GIF file only.
You can also easily embed media from other sites into your work simply by placing the web address for the media on a line by itself (do not hyperlink the URL). This site uses an auto embed feature to manage media. This supports media from sites such as YouTube, vimeo, flickr, Instagram, Soundcloud, Twitter, Animoto and many more (see the full list, link opens in new window)
You will see the embedded media in the editor once you click the blue UPDATE button to check your entry.
For example, if we want to include a YouTube video writer Ian McKewan's advice for writers, we paste it's URL on a line by itself:
https://www.youtube.com/watch?v=Kyfe6DljGPY
which will produce in the Writer interface, the embedded video:
If we want to use a flickr image of a smiley icon on a piece of paper, we put it's URL on a blank line:
https://www.flickr.com/photos/8411190@N04/6036682072/
and in your entry it will appear as:

Tweets work well to for auto embed, and will display with any media they contain. You need to find the URL for a single tweet (usually linked from its timestamp), e,g.
https://twitter.com/ronald_2008/status/630150299123064832
What's in your fortune cooky? #prisoner106 #ds106 pic.twitter.com/0xf6ERQuvA
— Ronald_2008 🤔🌻 (@ronald_2008) August 8, 2015
If you work with audio, the best place to store it online is SoundCloud (you can create accounts for free). Links to single SoundCloud track can be embedded by putting in the editor:
https://soundcloud.com/cogdogroo/arizona-rain-sounds
Author Information
Give credit as credit wants to be given...
Write in the name field your name, or pseudonym for how you wish to be credited for this response. Or include the name of others as collaborators, separated by commas.
We also ask for one email address; this information is never publicly displayed, and is used only if we have a question to ask you about your response.
Add a twitter name to let this site be able to track all of the work you submitted; if you prefer not to use a twitter account, at least create a unique name fo yourself that begins with a "@". Only enter one twitter name as a primary reference here; if you wish to credit others, enter these twitter names as tags (see below)
Tags
Tag your response with other descriptive information
Tags are optional but offer another way to associate common work. You may be instructed to use a tag to identify work for a particilaur course, subject, or you may find it useful to create a set of tags that associate different collections of your own work.
Separate all your tags with either a space or a comma- this means that tags must be a single word.
You can also add additional twitter names to credit as co-authors by including them as tags (be sure to use the "@" sign)
Update, Preview, Submit
Polish this thing up and send it on it...
The three buttons in the bottom are the steps to get your response on this site.
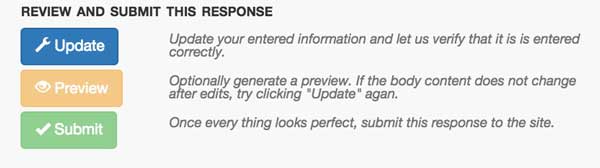
You first need to click the blue UPDATE button so the information can be verified. If we find any mistakes, we will provide instructions how to fix the problems.
Once the information is verified, you can optionally (but we strongly suggest using it) use the orange PREVIEW button to see how your information will be displayed on the site. This opens in a layer atop the form, and you can dismiss the preview via the "X" in the uppper right or just clicking outside the preview.
And if you are satisfied with your information, it is time to click the green SUBMIT button to send it to this site. Your confirmation will include a link that you can use to see what you have submitted (unless the site is moderated, you may have to wait until your entry is approved).
Note that once you submit a response, you can no longer edit it; this is why we recommend previewing your entry carefully. If you do see something you have submitted that needs fixing, just send a comment in at the bottom of the item; this will go to the site's web manager who should be able to follow up on your request.